#Convert a Project Document to Specified Format
Explore tagged Tumblr posts
Visit Tumblr Blog
Explore Tumblr blogs with no restrictions, modern design and the best experience.
Last Seen Tumblr Blogs


Fun Fact
China blocked Tumblr because of pornography and censorship problems in 2013.
Text
Call for Submissions for Phanatic Phanzine

Opening up submissions for the Phanatic Phanzine! 🥳Calling upon phandom members, new and old, to share their love for Dan and Phil!
We survived the Dan and Phil hiatus, and all we're making is this zine 🌈
The Phanatic Phanzine is a fanzine project created by myself and @aaaaaaaaa-no to celebrate the Dan and Phil content and fandom revival we are seeing. This will be a digital zine including artwork, fanvid tributes, poetry, and personal stories of the space DnP hold in our lives!
The plan is to compile these fan efforts into a digital zine by Christmas '23 and present it to DnP as a gift. 🎀
Since we intend to share it with dnp we will not be taking fanfic or NSFW submissions but we intend to do another zine in the future for the fans celebrating the fandom itself so look out for that one!
Submit at [email protected]
Deadline: 24th December 2023 GMT
Guidelines under the cut

General guidelines
The submissions will be screened for anything NSFW, and no fanfiction is being accepted. Likewise, please be mindful of the language used in written pieces. All submissions will be entertained in good faith.
📌We are also accepting written submissions and links through asks and DMs
We are accepting submissions in the form of artworks, fanvids, written personal accounts, and poetry. You may submit any of the media above but please keep in mind that we will only be accepting five artworks, two fanvids, one written personal account and three poems per person.
Submissions are to be sent to the email id provided above. Please add the name you wish to be credited with + any social media links to add, or specify if you would like your submission to be anonymous
Al generated content will not be a part of this zine
Any doubts or questions can be cleared via asks or messages on Tumblr, to either me or @aaaaaaaaa-no feel free to ask!
Specific guidelines:
For artwork:
Artwork can be digital, traditional, or mixed media
Submissions must be in the email attachment in jpg or png format
Old fanworks that have already been posted are allowed. For new works, please try to not post the full piece (wips okay) till the zine is released!
No more than 5 works per person
For poetry and personal accounts:
Word limit of 1000 words at most. Short notes with lower word count are more than welcome
All written submissions must be in a word or Google document, or written in the body of an email.
Anything posted elsewhere is allowed
No more than 1 personal account and 3 poems per person
For fanvids:
The video must be uploaded as an unlisted video on YouTube or similar video-sharing platforms. Videos that are already posted are allowed as well
Video links and a thumbnail in png or jpg format are to be submitted. The links will be converted to QR codes to present on the digital zine alongside the thumbnail You will be notified via email a few days before the zine is released so the videos can be made public in case they are currently unlisted
Shipping videos are not allowed for this zine, please be mindful of the same
No more than 2 fanvids per person
Adherence to the guidelines will make sorting much easier for the compilers so please try to do so!
To reiterate: even if you send in content that we cannot use we will engage with you in good faith 🌸
Please don’t be disheartened if your piece doesn’t make it! We plan to start work on a fanzine exclusively for the fandom (by and for the fans) soon which will allow content disallowed for this zine, so look out for that!😁
Help us spread this to others who may be interested!
We look forward to all your submissions💫
#dnp#dan and phil#phandom#dnpgames#dan and phil games#phanart#phil lester#dan howell#amazingphil#danisnotonfire#phan#phanatic phanzine
92 notes
·
View notes
Text
Call for Submissions for the Phanatic Phanzine!

Opening up submissions for the Phanatic Phanzine! 🥳 Calling upon phandom members, new and old, to share their love for Dan and Phil!
We survived the Dan and Phil hiatus, and all we're making is this zine 🌈
The Phanatic Phanzine is a fanzine project created by myself and @dapg-otmebytheballs to celebrate the Dan and Phil content and fandom revival we are seeing. This will be a digital zine including artwork, fanvid tributes, poetry, and personal stories of the space DnP hold in our lives!
The plan is to compile these fan efforts into a digital zine by Christmas '23 and present it to DnP as a gift. 🎀
Since we intend to share it with dnp we will not be taking fanfic or NSFW submissions for this zine but we intend to do another zine in the future for the fans celebrating the fandom itself so look out for that one!
Submit at: [email protected]
Deadline: 24th December 2023 GMT
Guidelines under the cut

General guidelines:
We are accepting submissions in the form of artworks, fanvids, written personal accounts, and poetry. You may submit any of the media above but please keep in mind that we will only be accepting five artworks, two fanvids, one written personal account and three poems per person.
📌We are also accepting written submissions and links through
asks and DMs
The submissions will be screened for anything NSFW, and no fanfiction is being accepted. Likewise, please be mindful of the language used in written pieces. All submissions will be entertained in good faith.
Submissions are to be sent to the email id provided above. Please add the name you wish to be credited with + any social media links to add, or specify if you would like your submission to be anonymous
Al generated content will not be a part of this zine
Any doubts or questions can be cleared via asks or messages on Tumblr, to either me or @dapg-otmebytheballs feel free to ask!
Specific guidelines:
For artwork:
Artwork can be digital, traditional, or mixed media
Submissions must be in the email attachment in jpg or png format
Old fanworks that have already been posted are allowed. For new works, please try to not post the full piece (wips okay) till the zine is released!
No more than 5 works per person
For poetry and personal accounts:
Word limit of 1000 words at most. Short notes with lower word count are more than welcome
All written submissions must be in a word or Google document, or written in the body of an email.
Anything posted elsewhere is allowed
No more than 1 personal account and 3 poems per person
For fanvids:
The video must be uploaded as an unlisted video on YouTube or similar video-sharing platforms. Videos that are already posted are allowed as well
Video links and a thumbnail in png or jpg format are to be submitted. The links will be converted to QR codes to present on the digital zine alongside the thumbnail You will be notified via email a few days before the zine is released so the videos can be made public in case they are currently unlisted
Shipping videos are not allowed for this zine, please be mindful of the same
No more than 2 fanvids per person
Adherence to the guidelines will make sorting much easier for the compilers so please try to do so!
To reiterate: even if you send in content that we cannot use we will engage with you in good faith 🌸
Please don’t be disheartened if your piece doesn’t make it! We plan to start work on a fanzine exclusively for the fandom (by and for the fans) soon which will allow content disallowed for this zine, so look out for that!😁
Help us spread this to others who may be interested!
We look forward to all your submissions💫
#Phanatic Phanzine#dan and phil#dnp#phil lester#daniel howell#phandom#danandphilgames#amazing phil#danisnotonfire#dapg#dan howell#please spread the word!!!
20 notes
·
View notes
Text
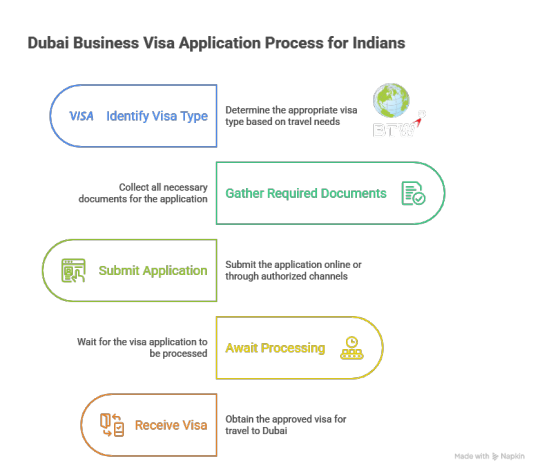
Business Visa for Dubai from India — 2025 Guide
Dubai, the commercial capital of the United Arab Emirates (UAE), continues to be a prime destination for Indian entrepreneurs, corporate professionals, and investors. Known for its strategic location, modern infrastructure, and vibrant economy, Dubai offers immense opportunities for cross-border trade and investment. If you are planning a business trip from India, understanding the process of obtaining a business visa for Dubai is essential. This blog outlines the requirements, application steps, processing time, and frequently asked questions regarding the Dubai business visa from India in 2025.
hat is a Dubai Business Visa?
A Dubai business visa is a short-term entry permit issued to foreign nationals who wish to enter the UAE, specifically Dubai, for business-related purposes. These may include attending meetings, conferences, seminars, trade fairs, or exploring business opportunities with local companies. This visa is typically issued under the UAE's visit visa category and does not allow full-time employment.
There is also a long-term business visa option under the UAE Golden Visa program for eligible entrepreneurs and investors, but the standard short-term business visa remains the most common option for Indian professionals.
Types of Business Visas for Dubai
Short-term Single-Entry Business Visa Valid for 30 or 60 days, allows one-time entry to Dubai for business purposes.
Multiple-Entry Business Visa Valid for up to 90 days, ideal for frequent travelers involved in long-term business discussions or ongoing projects.
Business Visa under UAE Golden Visa Scheme Offers long-term residency to selected entrepreneurs, subject to eligibility criteria and approval by the UAE government.
Documents Required for Dubai Business Visa from India
The documentation requirements for Indian citizens applying for a Dubai business visa typically include:
Valid Indian passport (minimum six months validity)
Passport-size photograph with white background
Invitation letter from a UAE-based company or business event
Confirmed round-trip flight tickets
Proof of accommodation in Dubai
Financial documents such as bank statements
Travel insurance (if required)
Some visa providers or sponsors may ask for additional documents depending on the applicant’s background and purpose of visit.
Processing Time for Dubai Business Visa
The average processing time for a Dubai business visa from India is 3 to 5 working days. However, the duration may vary based on factors like:
Time of the year (higher volumes during major events or peak seasons)
Completeness of application
Additional background checks, if applicable
Applicants are advised to apply at least 10–14 days before their intended travel date to avoid delays.
Reference: UAE Official Portal – Visa and Emirates ID
Business Visa Fees
While fees may vary slightly based on duration and service type, general costs for Indian applicants include:
30-day single-entry business visa: AED 350 – AED 500
60-day visa: AED 650 – AED 750
90-day multiple-entry visa: AED 1,200 – AED 1,500
Some applicants may also opt for express processing for an additional fee.
Tips for a Smooth Application Process
Ensure your passport is valid for at least six months beyond your planned travel dates.
Submit clear, correctly formatted documents in the specified formats.
Secure your invitation letter and accommodation proof in advance.
Book biometrics or visa center appointments early, if required.
FAQs – Business Visa for Dubai from India
Q1. Can Indian citizens apply for a Dubai business visa online? Yes, Indian citizens can apply online through authorized visa agents or through a UAE-based sponsor. Most applications are processed electronically.
Q2. How long can I stay in Dubai on a business visa? Depending on the type of visa issued, you can stay for 30, 60, or up to 90 days. It is important not to overstay as it may incur penalties.
Q3. Can I convert a business visa into a work visa while in Dubai? No, you must return to India and apply for a work visa separately. Business visas are strictly for temporary visits.
Q4. Do I need a local sponsor for the business visa? Yes, a UAE-based company or host is usually required to sponsor or invite the applicant, especially for business-specific visits.
Q5. Is travel insurance mandatory for the Dubai business visa? While not always compulsory, travel insurance is highly recommended and may be required for certain visa categories or durations.
Final Thoughts
For Indian professionals and businesspersons, Dubai offers unmatched opportunities in sectors ranging from finance and logistics to real estate and technology. Securing a business visa is a straightforward process if proper documentation and timelines are followed. As policies and processing times may evolve, it’s advisable to consult the official UAE visa portal or the General Directorate of Residency and Foreigners Affairs for up-to-date information.
For more details, refer to: https://u.ae/en/information-and-services/visa-and-emirates-id/visa
0 notes
Text
The Process of Professional Thai Transcription Services
Thai transcription services involve the process of converting spoken Thai language from audio or video recordings into written text. This service is crucial for businesses, content creators, legal professionals, healthcare providers, and other industries requiring accurate and reliable transcriptions of conversations, interviews, meetings, and other spoken material in Thai.

These services cater to a variety of needs, from converting podcasts and webinars into readable formats to transcribing court hearings or medical consultations. Thai transcription requires a high level of proficiency in the language, including understanding regional accents, cultural nuances, and industry-specific terminology.
There are two primary methods for Thai transcription: manual transcription, where skilled human transcribers listen to the audio and transcribe it word-for-word, and automated transcription, which relies on software and AI algorithms. While automated tools can offer speed, human transcriptionists ensure higher accuracy, especially for complex or noisy recordings.
Overall, professional Thai transcription services provide invaluable support for businesses looking to enhance accessibility, improve SEO through transcribed content, and ensure legal and medical accuracy in their records.
Step 1: Receiving the Audio or Video File
File Submission: Clients submit their audio or video recordings in various formats, such as MP3, WAV, or MP4. Files can be uploaded via secure portals or emailed, depending on the service provider's preferences.
File Requirements: Clients specify any special instructions, such as whether the file includes multiple speakers, background noise, or if timestamps are needed.
Step 2: Choosing the Right Transcriptionist
Expertise Matching: The transcription provider selects a native Thai speaker with expertise in the relevant industry (e.g., legal, medical, or business) to ensure that specialized terminology is accurately transcribed.
Human vs. AI: While AI transcription tools may be used in some cases for faster turnaround, human transcriptionists are preferred for complex projects, especially for content that requires contextual understanding or nuanced language.
Step 3: Transcription Process
Listening & Understanding: The transcriptionist listens carefully to the audio or video file, paying attention to accents, background noises, and dialects. Thai transcriptionists must be familiar with regional variations in pronunciation and vocabulary.
Word-by-Word Transcription: The transcriptionist types out every spoken word in Thai, ensuring accuracy and coherence. In cases of unclear speech or difficult accents, the transcriber may pause, replay, or research terms to ensure the best transcription.
Handling Multiple Speakers: If the recording includes multiple speakers, the transcriptionist distinguishes between them, marking each speaker’s dialogue clearly.
Step 4: Quality Control and Editing
Proofreading: Once the initial transcript is completed, it undergoes a thorough proofreading process. The transcriptionist reviews the text for spelling, grammar, and punctuation errors.
Verifying Accuracy: The transcript is checked against the original audio to ensure no words, phrases, or important details are missed. The transcriptionist cross-references challenging parts of the audio for clarity.
Ensuring Consistency: Industry-specific terms, jargon, and proper nouns are verified for consistency and accuracy.
Step 5: Final Review and Formatting
Formatting for Readability: The transcript is formatted to ensure it is easy to read. Common formats include standard text documents (Word or PDF) or more structured formats with timestamps for video or audio recordings.
Timestamps (if required): If the transcript needs to be time-coded, timestamps are added at specific intervals, such as every time a new speaker begins or at regular time markers (e.g., every minute).
Client Specifications: The transcript is customized according to the client's specific needs, whether it’s for subtitles, legal documentation, or content marketing.
Step 6: Delivery and Client Review
Delivery of Transcripts: The final transcript is sent to the client through their preferred method, typically via email or a secure file-sharing platform.
Client Feedback: Clients review the transcript to ensure that it meets their expectations. If there are any issues or revisions needed, the client can provide feedback.
Revisions: If required, the transcription provider makes any necessary revisions based on the client’s feedback and sends the updated document.
Step 7: Final Approval
Client Satisfaction: Once the client is satisfied with the final transcript, the service is marked as complete.
Archiving: The final version is stored for future reference or can be deleted upon the client’s request for privacy and security reasons.
Why Professional Thai Transcription Services
Explore the importance of accuracy in transcriptions and how professionals ensure that no detail is missed.
Discuss the benefits, such as high-quality results, confidentiality, and time efficiency.
Illustrate how outsourcing transcription helps businesses and individuals focus on core tasks.
Examine why professionals in these industries require precise transcription for records and communication.
Highlight the limitations of automated transcription software and the advantages of human transcriptionists.
Explain how transcriptions make audio or video content accessible to a wider audience, including those with hearing impairments.
Show how transcriptions can improve SEO, engagement, and the reach of online content.
Discuss why companies prefer to outsource transcription for high-quality and reliable results.
Focus on how accurate transcription ensures that content stays consistent and professional across channels.
Explore how accurate transcription supports companies working in global markets with Thai-speaking customers or partners.
Discuss how transcriptions play a crucial role in research, interviews, and academic documentation.
Examine the need for professional transcription to create precise subtitles or captions for films, videos, and webinars.
Highlight the security measures that professional services take to ensure sensitive information is kept confidential.
Discuss how accurate transcription prevents costly errors and the need for revisions.
Explain how understanding the cultural context of the Thai language helps transcribers capture the full meaning of the conversation.
#transcription services#language translation services#best translation#malaysia#translation services Malaysia
0 notes
Text
Our professional legal translation services ensure that your documents are translated with precision and expertise
In this globalized world, the demand for correct and accurate legal translation services has never been greater. Be it contracts, patents, court documents, or any other legal material, ensuring that your documents are translated correctly is the need of the hour. With this in mind, our professional legal translation services give you the peace of mind that your sensitive information is handled with precision and expertise.
Why Choose Professional Legal Translation Services?
Legal translation is not only a means of converting text from one language to another; knowledge of legal terms and its application in various jurisdictions under their respective legal frameworks is demanded. Mistakes in law translation can lead to financial or loss of it, legal processes can be undermined and even disputes are created and hence the translation should involve professional legal translation services experts.
We are a team of expert translators knowledgeable of legal language and its nuances. The language is understood not just through the use of words but also from the context and meaning associated with legal documents. This, therefore, ensures that texts translated carry the same legal weight and implications as the original texts.
Custom Solutions to Meet Diverse Requirements
Every legal document is unique, and every client has different needs. Our official translation services DMCC (Dubai Multi Commodities Centre) cater to businesses and individuals alike within Dubai and beyond. We understand the local legal landscape and can provide precise legal translation services in Dubai tailored to meet the regulatory requirements and expectations of regional authorities.
Whether you are a law firm needing documents translated for international clients, a business looking to expand into foreign markets, or an individual needing personal documents translated, our services are comprehensive and flexible. We cover a wide range of legal documents, including:
- Contracts and Agreements
- Court Documents
- Patents and Trademarks
- Immigration Papers
- Business Licenses and Certificates
Our professional legal translation services ensure your documents remain legally binding in any language.
The Translation Process in Legal Documents
Upon hiring our translation services on your legal documents, you can be assured of their detailed process to ensure perfect translation. Here's a general outline of how we make it work:
1. First Consultation: Once we get to know all the requirements and nature behind your translation, we sort the best translator who best deals with the related filed of law.
2. Translation: Our translators now undertake their job of translating while ensuring the work conveys exactly the same legal implications as found in the original document. They make use of parallel forms of equivalent legal terms and phrases with similar meanings within the target language.
3. Quality Control: Now, once translated, there is always quality control with the assistance of another competent translator through proofreading and editing on the accuracy, consistency, and completeness.
4. Final Delivery: The final product is provided once the document has received its thorough review, in your specified format. We check to make sure that any of our legal translations are perfect both in content and appearance as requested.
Why Select Us?
When searching for legal translation services in Dubai, you will be exposed to many choices. However, we stand out because of our commitment to quality, confidentiality, and precision. We make sure that your projects reach you on time while observing the highest standards of accuracy. Our team has extensive experience and expertise in legal language and is aware of both local and international legal practices.
By choosing our professional legal translation services, you can concentrate on your legal matters while we take care of the complexity of translation. We are here to assist you, whether you require official translation services under DMCC or need specific legal document translation.
In conclusion, making arrangements for your legal documents with the necessary professionals is very important in the maintenance of your interests within that transaction or legal proceeding. In this regard, our professional legal translation services guarantee perfectly translated documents, which help the way to successful cross-boundary communication. Contact Diamond Legal Translation now to find out more of how we can address the needs of your legal translation requirements.
#translation services#legal translation#legal translation services#diamond legal translation#legal translation service#website translation#general translation
0 notes
Text
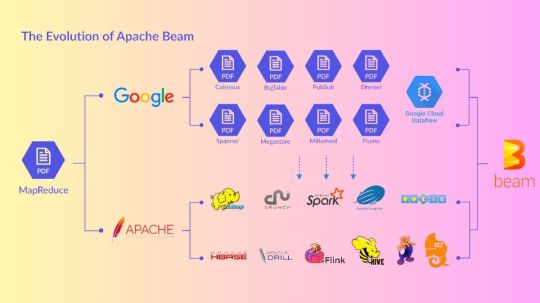
Apache Beam For Beginners: Building Scalable Data Pipelines
Apache Beam
Apache Beam, the simplest method for streaming and batch data processing. Data processing for mission-critical production workloads can be written once and executed anywhere.
Overview of Apache Beam
An open source, consistent approach for specifying batch and streaming data-parallel processing pipelines is called Apache Beam. To define the pipeline, you create a program using one of the open source Beam SDKs. One of Beam’s supported distributed processing back-ends, such as Google Cloud Dataflow, Apache Flink, or Apache Spark, then runs the pipeline.
Beam is especially helpful for situations involving embarrassingly parallel data processing, where the issue may be broken down into numerous smaller data bundles that can be handled separately and concurrently. Beam can also be used for pure data integration and Extract, Transform, and Load (ETL) activities. These operations are helpful for loading data onto a new system, converting data into a more suitable format, and transferring data between various storage media and data sources.Image credit to Apache Beam
How Does It Operate?
Sources of Data
Whether your data is on-premises or in the cloud, Beam reads it from a wide range of supported sources.
Processing Data
Your business logic is carried out by Beam for both batch and streaming usage cases.
Writing Data
The most widely used data sinks on the market receive the output of your data processing algorithms from Beam.
Features of Apache Beams
Combined
For each member of your data and application teams, a streamlined, unified programming model for batch and streaming use cases.
Transportable
Run pipelines across several execution contexts (runners) to avoid lock-in and provide flexibility.
Wide-ranging
Projects like TensorFlow Extended and Apache Hop are built on top of Apache Beam, demonstrating its extensibility.
Open Source
Open, community-based support and development to help your application grow and adapt to your unique use cases.
Apache Beam Pipeline Runners
The data processing pipeline you specify with your Beam program is converted by the Beam Pipeline Runners into an API that works with the distributed processing back-end of your choosing. You must designate a suitable runner for the back-end where you wish to run your pipeline when you run your Beam program.
Beam currently supports the following runners:
The Direct Runner
Runner for Apache Flink Apache Flink
Nemo Runner for Apache
Samza the Apache A runner Samza the Apache
Spark Runner for Apache Spark by Apache
Dataflow Runner for Google Cloud Dataflow on Google Cloud
Jet Runner Hazelcast Jet Hazelcast
Runner Twister 2
Get Started
Get Beam started on your data processing projects.
Visit our Getting started from Apache Spark page if you are already familiar with Apache Spark.
As an interactive online learning tool, try the Tour of Beam.
For the Go SDK, Python SDK, or Java SDK, follow the Quickstart instructions.
For examples that demonstrate different SDK features, see the WordCount Examples Walkthrough.
Explore our Learning Resources at your own speed.
on detailed explanations and reference materials on the Beam model, SDKs, and runners, explore the Documentation area.
Learn how to run Beam on Dataflow by exploring the cookbook examples.
Contribute
The Apache v2 license governs Beam, a project of the Apache Software Foundation. Contributions are highly valued in the open source community of Beam! Please refer to the Contribute section if you would want to contribute.
Apache Beam SDKs
Whether the input is an infinite data set from a streaming data source or a finite data set from a batch data source, the Beam SDKs offer a uniform programming model that can represent and alter data sets of any size. Both bounded and unbounded data are represented by the same classes in the Beam SDKs, and operations on the data are performed using the same transformations. You create a program that specifies your data processing pipeline using the Beam SDK of your choice.
As of right now, Beam supports the following SDKs for specific languages:
Java SDK for Apache Beam Java
Python’s Apache Beam SDK
SDK Go for Apache Beam Go
Apache Beam Python SDK
A straightforward yet effective API for creating batch and streaming data processing pipelines is offered by the Python SDK for Apache Beam.
Get started with the Python SDK
Set up your Python development environment, download the Beam SDK for Python, and execute an example pipeline by using the Beam Python SDK quickstart. Next, learn the fundamental ideas that are applicable to all of Beam’s SDKs by reading the Beam programming handbook.
For additional details on specific APIs, consult the Python API reference.
Python streaming pipelines
With Beam SDK version 2.5.0, the Python streaming pipeline execution is possible (although with certain restrictions).
Python type safety
Python lacks static type checking and is a dynamically typed language. In an attempt to mimic the consistency assurances provided by real static typing, the Beam SDK for Python makes use of type hints both during pipeline creation and runtime. In order to help you identify possible issues with the Direct Runner early on, Ensuring Python Type Safety explains how to use type hints.
Managing Python pipeline dependencies
Because the packages your pipeline requires are installed on your local computer, they are accessible when you execute your pipeline locally. You must, however, confirm that these requirements are present on the distant computers if you wish to run your pipeline remotely. Managing Python Pipeline Dependencies demonstrates how to enable remote workers to access your dependencies.
Developing new I/O connectors for Python
You can develop new I/O connectors using the flexible API offered by the Beam SDK for Python. For details on creating new I/O connectors and links to implementation guidelines unique to a certain language, see the Developing I/O connectors overview.
Making machine learning inferences with Python
Use the RunInference API for PyTorch and Scikit-learn models to incorporate machine learning models into your inference processes. You can use the tfx_bsl library if you’re working with TensorFlow models.
The RunInference API allows you to generate several kinds of transforms since it accepts different kinds of setup parameters from model handlers, and the type of parameter dictates how the model is implemented.
An end-to-end platform for implementing production machine learning pipelines is called TensorFlow Extended (TFX). Beam has been integrated with TFX. Refer to the TFX user handbook for additional details.
Python multi-language pipelines quickstart
Transforms developed in any supported SDK language can be combined and used in a single multi-language pipeline with Apache Beam. Check out the Python multi-language pipelines quickstart to find out how to build a multi-language pipeline with the Python SDK.
Unrecoverable Errors in Beam Python
During worker startup, a few typical mistakes might happen and stop jobs from commencing. See Unrecoverable faults in Beam Python for more information on these faults and how to fix them in the Python SDK.
Apache Beam Java SDK
A straightforward yet effective API for creating batch and streaming parallel data processing pipelines in Java is offered by the Java SDK for Apache Beam.
Get Started with the Java SDK
Learn the fundamental ideas that apply to all of Beam’s SDKs by beginning with the Beam Programming Model.
Further details on specific APIs can be found in the Java API Reference.
Supported Features
Every feature that the Beam model currently supports is supported by the Java SDK.
Extensions
A list of available I/O transforms may be found on the Beam-provided I/O Transforms page.
The following extensions are included in the Java SDK:
Inner join, outer left join, and outer right join operations are provided by the join-library.
For big iterables, sorter is a scalable and effective sorter.
The benchmark suite Nexmark operates in both batch and streaming modes.
A batch-mode SQL benchmark suite is called TPC-DS.
Euphoria’s Java 8 DSL for BEAM is user-friendly.
There are also a number of third-party Java libraries.
Java multi-language pipelines quickstart
Transforms developed in any supported SDK language can be combined and used in a single multi-language pipeline with Apache Beam. Check out the Java multi-language pipelines quickstart to find out how to build a multi-language pipeline with the Java SDK.
Read more on govindhtech.com
#ApacheBeam#BuildingScalableData#Pipelines#Beginners#ApacheFlink#SourcesData#ProcessingData#WritingData#TensorFlow#OpenSource#GoogleCloud#ApacheSpark#ApacheBeamSDK#technology#technews#Python#machinelearning#news#govindhtech
0 notes
Text
Outsource HTML Conversion Services in India
When we transform HTML documents, it helps websites, apps, and software use the data more efficiently. As the reliance on HTML grows, the necessity for HTML conversion services becomes critical. Furthermore, HTML conversion is an important activity because a project may require a large number of pages to be converted into a specified format. Every day, a large amount of information is generated in a variety of formats. Eventually, transforming this data to HTML-compatible formats becomes necessary. Data Entry Expert is the leading HTML conversion outsourcing firm in India, offering customized and cost-effective HTML conversion services to clients worldwide.
To know more - https://www.dataentryexpert.com/data-conversion/html-conversion-services.php

#htmlconversionservices#outsourcehtmlconversion#htmlconversion#htmlconversionservicesinindia#besthtmlconversionservices#htmlconversionservice#affordablehtmlconversionservice#outsourcehtmlconversionservices
0 notes
Text
Understanding Hex Color Codes: How They Work and Why They Matter

In the world of digital design and web development, colors serve not only to enhance visual appeal but also to convey meaning, brand identity, and user experience. They play a pivotal role in shaping how information is perceived and interacted with online. Behind every vibrant website or engaging digital interface lies a sophisticated system of color representation: hex color codes.
These codes are indispensable tools that empower designers and developers to define precise color choices across diverse platforms and devices, ensuring consistency and fidelity to creative intent. This article explores the nuanced workings of hex color codes, shedding light on their intricacies, practical applications, and significance in modern digital media.
Hexadecimal Notation Explained
Hexadecimal, or "hex" for short, is a base-16 numbering system widely used in computing. Unlike our familiar decimal system (base-10), which uses ten digits (0-9), hexadecimal incorporates six additional symbols: A, B, C, D, E, and F, representing values 10 to 15. This system's utility stems from its direct correlation with binary, the fundamental language of computers. Each hexadecimal digit corresponds precisely to a grouping of four binary digits (bits), making it a convenient shorthand for representing binary values in a more manageable and human-readable format.
Components of Color: RGB Model
Colors displayed on digital screens are synthesized using the RGB (Red, Green, Blue) color model. This model operates on the principle of additive color mixing, where different intensities of red, green, and blue light combine to create a vast spectrum of colors. In RGB, each color component can independently vary from 0 (minimum intensity) to 255 (maximum intensity), allowing for precise control over the hue, saturation, and brightness of displayed colors.
Encoding Colors with Hex Color Codes
Hex color codes are a compact and efficient method of specifying colors in digital environments. Represented by a hash symbol (#) followed by six hexadecimal digits (e.g., #RRGGBB), these codes succinctly convey the intensity levels of red, green, and blue that compose a particular color. For instance, the hex code #FF0000 signifies pure red, with the red component at its maximum intensity (FF in hexadecimal) and no green or blue present (00 in hexadecimal).
Understanding Hexadecimal Conversion
Converting RGB values to hex color codes involves translating each decimal (base-10) value of the RGB components into its hexadecimal equivalent. This conversion simplifies the process of specifying colors in web design and graphic editing software, ensuring consistency across different platforms and devices. For example, the RGB value (255, 0, 0) converts directly to the hex code #FF0000, reflecting its pure red composition.
Efficiency and Range of Hex Codes
Hexadecimal notation offers significant advantages in terms of both efficiency and range. By condensing complex RGB values into a concise six-digit format, hex color codes facilitate streamlined communication and implementation of color specifications in digital media. With 16,777,216 possible combinations (16^6), hex codes encompass a comprehensive palette of colors that can be accurately reproduced on various digital screens, ensuring fidelity to designers' creative intentions.
Hex Code Abbreviations
In addition to full six-digit hex codes, abbreviated versions can be used for common colors. This shorthand notation offers several benefits:
Compactness: Reduces the code length to three digits, enhancing readability and efficiency in coding.
Performance Optimization: Helps optimize web page performance by reducing file sizes in CSS and HTML documents.
Ease of Use: Simplifies color specification and editing, particularly in large-scale web projects.
Compatibility: Widely supported across browsers and digital platforms, ensuring consistent color rendering.
For example:
#F00: Represents pure red (#FF0000).
#0F0: Represents pure green (#00FF00).
Practical Applications in Web Design
Hex color codes serve as foundational tools in web design, providing designers with a precise means to specify and manipulate colors across different digital platforms. By incorporating hex codes directly into CSS stylesheets or HTML attributes, designers ensure uniformity and coherence in color schemes, regardless of the viewing device or browser. This approach facilitates seamless adjustments and updates to color palettes throughout the development lifecycle, enhancing both aesthetic appeal and user experience.
Learning and Skill Development
Understanding hex color codes extends beyond practical application in web design, encompassing broader implications for digital media production and software development. Mastery of hex codes equips designers and developers with enhanced control over color manipulation and presentation, fostering creativity and technical proficiency across various digital disciplines. By grasping the nuances of hexadecimal notation and its relationship to RGB color encoding, professionals can elevate their capabilities in graphic design, image editing, and interface development.
Conclusion
In conclusion, hex color codes represent a cornerstone of modern digital design, enabling precise color representation and consistency in an increasingly digital world. By leveraging hexadecimal notation and its applications in the RGB color model, designers empower themselves to articulate visual concepts effectively and create compelling digital experiences. Mastery of hex color codes not only enhances technical proficiency but also enriches creative expression, underscoring their significance as essential tools for contemporary digital professionals.
0 notes
Text
VeryUtils PDF to Word Converter SDK for Developers Royalty Free
VeryUtils PDF to Word Converter SDK for Developers Royalty Free.
https://veryutils.com/pdf2word
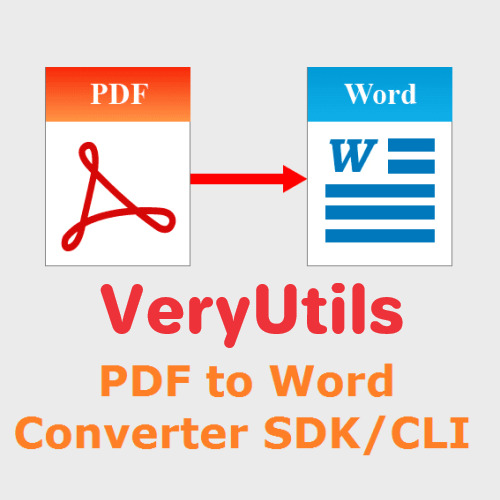
✅ VeryUtils PDF to Word Converter SDK/CLI VeryUtils PDF to Word Converter SDK enables programmers and system administrators to seamlessly integrate powerful VeryUtils PDF to Word conversion functions into applications and server environments. VeryUtils PDF to Word Converter SDK allows software developers or professional users to batch convert VeryUtils PDF to Word documents silently, giving you simple but incredibly powerful PDF conversion capabilities and workflow solutions.
You can integrate VeryUtils PDF to Word Conversion functions to your workflow or software, allowing your users to edit PDF contents, tables, text, or images as Word files. You can easily to integrate using C#, VB.NET, Java, PHP, Python.
With VeryUtils PDF to Word Converter SDK software, you can convert and edit Adobe PDF Documents in MS Word easily, just convert PDF files to Word files, then you can modify text, font, bullet lists, tables, images and more in MS Word application.
✅ VeryUtils PDF to Word SDK supports Command Line
VeryUtils PDF to Word SDK can be used as a VeryUtils PDF to Word Converter Command Line Tool. The Command Line Tool enables users to easily automate VeryUtils PDF to Word conversion tasks. Users can convert specific page ranges, entire PDF files, or even multiple PDFs at once to one of three output formats: DOCX (Microsoft Word 2007 and later), RTF, and DOC.
VeryUtils PDF to Word SDK offers different ways to integrate SDK into your projects using the native (C) or COM interfaces as well as .Net, Python, Java, C++, C proxy libraries.
✅ What is VeryUtils PDF to Word ActiveX DLL?
VeryUtils PDF to Word ActiveX DLL is a standalone ActiveX DLL/Component that facilitates the conversion of PDF files into Microsoft Word documents (RTF, DOC, DOCX formats). Unlike many other solutions, this component does not require Adobe Acrobat or Acrobat Reader to function, making it a lightweight and independent choice for developers.
✅ VeryUtils PDF to Word Converter SDK/CLI features:
PDF to Microsoft Word (DOC, DOCX, RTF).
Use Command Line to batch convert PDF files to Word documents.
Native support for batch conversions (bash, cmd, PS, sh).
Output file format customization and precise formatting options.
Specifying passwords for encrypted PDF files.
Subset conversion: define page range for conversion.
Scheduled conversion: automate VeryUtils PDF to Word conversion.
Batch PDF Conversion: convert multiple PDF files to Word documents quickly.
Three output formats: DOCX (Microsoft Word 2007 and later), RTF (rich text format), and DOC.
Reconstruct Word and RTF documents from PDF files.
Standalone software and don't require MS Word and Adobe Acrobat installed.
Quick extract values from PDFs.
Integrate VeryUtils PDF to Word conversion to your workflow or software easily.
Edit PDF contents, tables, text, or images in MS Word application.
Accurate VeryUtils PDF to Word conversion that preserves fonts, columns, tables, images, lists and page layouts.
Directly convert VeryUtils PDF to Word without needing any MS Office software or third-party software.
Multi-threaded conversion allows you to handle millions of document conversions.
Able to integrate into server and web applications.
Data mining PDF documents.
Folder watchers.
Populating databases from PDF.
Publishing PDF documents in Word.
Call the tool from script files with ease using the command line interface.
Batch PDF Conversion: convert multiple PDF files in a directory path with a single command.
✅ VeryUtils PDF to Word SDK Licensing:
The VeryUtils PDF to Word Conversion SDK is licensed as a Developer License and OEM Distribution License.
A Developer License allows the deployment of the licensed software to one (1) client computer (for internal usage only). It does not include the right for access by concurrent users. A desktop computer is a computer that is designed for and is used by a single user.
To distribute the developed software outside your organization you will need an OEM License.
✅ VeryUtils PDF to Word Converter SDK/CLI Advanced Features:
Accurate Conversion of Complex Documents: This DLL ensures that even complex PDF documents, including those with intricate layouts and designs, are accurately converted into Word format.
Support for Images and PDF Drawing Primitives: It efficiently handles the conversion of images and most drawing elements like lines, curves, and polygons found in PDFs.
Table Recognition: One of its standout features is the ability to recognize and convert tables, maintaining the structure and data integrity during the conversion.
Optimization Modes: Developers can choose between two conversion modes—preserving the original layout (Exact Mode) or preserving text flow (Flowing Mode). This flexibility allows for optimized outputs depending on the document's complexity and the need for editability.
Comprehensive Language Support: The component supports all Unicode languages in PDF files, making it suitable for global applications.
Standalone Operation: Since it doesn't rely on external software like Adobe Acrobat, it reduces dependencies and streamlines the development process.
Multi-Language Support: It’s compatible with a wide range of development languages including VB Script, Javascript, Perl, PHP, Python, ASP, ASP.Net, VB.Net, C#, VB, Delphi, VC++, and Java. This makes it a versatile tool across different programming environments.
Wide OS Compatibility: The DLL supports a broad spectrum of Windows versions, including Windows XP through to Windows 11, as well as Windows Server editions from 2003 to 2016 (including R2 versions).
Royalty-Free Distribution: Developers can integrate this DLL into their applications without worrying about additional distribution fees, offering a cost-effective solution for both commercial and non-commercial applications.
Unlimited Usage: There are no restrictions on the number of applications you can build with this DLL, providing developers with unlimited potential.
0 notes
Text
Company Liquidation in Dubai: A Comprehensive Guide
Company liquidation in Dubai is a legal process undertaken to terminate all business activities of a company and dissolve it. This decision may be driven by several factors, such as accumulated losses, market changes, or the desire to restructure the business. In this comprehensive guide, we will delve into the procedures for company liquidation in Dubai, the reasons that compel companies to make this decision, and the laws governing this process.
Reasons for Company Liquidation in Dubai
Several reasons may lead a company to decide on liquidation, including:
Accumulated losses: When a company continues to incur significant financial losses and there is no hope of improving its financial situation.
Termination of the company's purpose: A company may be liquidated if the purpose for which it was established has been achieved or if there is no longer a need for it.
Shareholders' decision: Shareholders may decide to liquidate the company if they cannot agree on managing the company or if they wish to invest their funds in other projects.
Force majeure: A company may be forced to liquidate due to circumstances beyond its control, such as wars, natural disasters, or global economic crises.
Legal proceedings: Liquidation may be imposed on a company by a court order if the company commits legal violations or is unable to pay its debts.
Read More: Company Dispute Lawyer Dubai
Procedures for Company Liquidation in Dubai
The procedures for company liquidation in Dubai involve several key steps:
Liquidation decision: The decision to liquidate is made either by the shareholders or by a court order.
Appointment of a liquidator: A legal liquidator is appointed to oversee the liquidation process. The liquidator assesses the company's assets, settles its debts, and distributes the remaining assets to the shareholders.
Notification of creditors: The liquidator must notify all company creditors of the liquidation decision and invite them to submit their claims.
Sale of assets: The liquidator sells the company's assets to convert them into cash to settle debts.
Distribution of remaining assets: After all debts have been settled, the remaining assets are distributed to the shareholders according to their rights.
Striking the company off the commercial register: Once all liquidation procedures are completed, the company is struck off the commercial register.
Read More: company formation lawfirm dubai
Laws Governing Company Liquidation in Dubai
The laws of the United Arab Emirates, particularly the Commercial Companies Law, govern company liquidation procedures. Companies seeking to liquidate their businesses must comply with these laws and the specified procedures.
Read More: corporate lawyers in dubai
Importance of Consulting a Specialist Lawyer
Given the complexities of the legal procedures involved in company liquidation, it is advisable for companies to consult a specialist lawyer in this field. A lawyer can provide the necessary legal advice, assist in preparing the required documents, and follow up on legal procedures until the liquidation process is completed.
Conclusion Company liquidation is a significant legal process that requires adherence to specific procedures. Companies considering liquidation should understand the reasons, procedures, and legal implications involved in this decision. Consulting a specialist lawyer is essential to ensure a smooth and efficient liquidation process.

0 notes
Text
Best Practices for Python Code Documentation
INTRODUCTION
Documentation in Python code is crucial for ensuring readability, maintainability, and collaboration within a project. Here are some best practices for effective Python code documentation@ www.nearlearn.com:
Describe our code. ...
Create docstrings for all public classes, methods, functions, and modules. ...
Create appealing documentation with Sphinx
Adopt a unified style. ...
Incorporate illustrations in the writing. ...
Describe limitations. ...
Don't document internal information. ...
Maintain a changelog…
By following these best practices, you can create Python code that is well-documented, easy to understand, and a pleasure to work with for both yourself and other developers.
You can always stop and review the resources linked here if you get stuck.
Top of Form
Your Environment for Building Documentation. ...
Create the Sample Python Package. ...
Write and Format Your Docstrings. ...
Prepare Your Documentation With MkDocs.
Best code documentation for python is :
Is far and away the most popular Python training tool. Use it. It converts reStructuredText markup language into a range of output formats including HTML, LaTeX (for printable PDF versions), manual pages, and plain text. There is also great, free hosting for your
Certainly! Here's a comprehensive guide to best practices for documenting Python code:
Use Meaningful Variable and Function Names: Clear and descriptive names reduce the need for excessive comments by making the code self-explanatory.
Follow PEP 8 Guidelines: Adhere to the Python Enhancement Proposal (PEP) 8 style guide for consistent code formatting, including comments and docstrings.
Use Docstrings: Write docstrings for modules, classes, functions, and methods. Docstrings provide inline documentation that can be accessed via tools like help Use Triple Quotes for Multiline Docstrings Triple quotes allow for multiline docstrings, enabling comprehensive documentation for complex functions or classes.
Follow the Google Style Docstring Format: Adopt the Google style docstring format for consistency and compatibility with popular documentation generators like Sphinx. This format includes sections such as "Args", "Returns", "Raises", and "Examples".
Document All Parameters and Return Values: Clearly document all parameters accepted by functions or methods, along with their types and purposes. Document the expected return values and their meanings.
Document Exception Handling: If a function raises exceptions under certain conditions, document those conditions and the types of exceptions that may be raised.
Provide Usage Examples: Include usage examples in your docstrings to illustrate how to use functions or methods effectively. Real-world examples help users understand the intended usage.
Update Documentation Regularly: Keep documentation up-to-date with code changes. Outdated documentation can mislead users and cause confusion.
Use Documentation Generators: Utilize documentation generators like Sphinx, Pdoc, or Doxygen to automate the generation of documentation from your codebase. These tools can produce professional-looking documentation in various formats.
Include Module-Level Documentation: Provide an overview of each module's purpose, contents, and usage at the beginning of the file. This summary helps users quickly grasp the module's functionality.
Document Class Interfaces: Document class interfaces, including methods, properties, and their purposes. Describe how to instantiate objects and interact with them.
Include Version Information: Specify the version of your code in the documentation. Users should know which version of the code they are referencing to ensure compatibility.
Document Public APIs Thoroughly: Document all public APIs extensively, including their parameters, return values, exceptions, and usage examples. Well-documented APIs facilitate easier integration and usage by other developers.
By following these best practices, you can ensure that your Python code is well-documented, easy to understand, and accessible to users and collaborators. Best institute in Bangalore is nearlearn visit our page https://nearlearn.com/python-online-training.
0 notes
Text
Too Many Iterations? How to Avoid Three Common Problems in Semiconductor Design
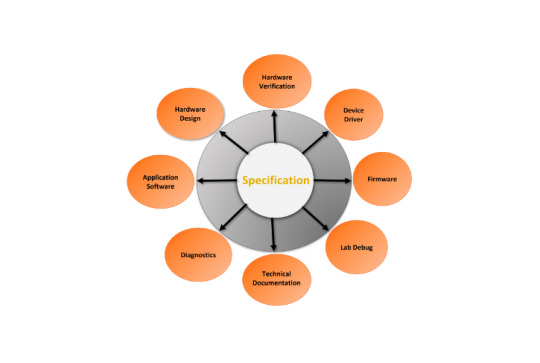
Developing semiconductor intellectual property (IP), system-on-chip (SoC) designs, and complete systems is enormously challenging. Even a small error in the hardware design can require a very expensive chip turn to fix. Of course, this also delays time to market (TTM), as do any unexpected issues arising in design verification, hardware/software co-verification (also known as pre-silicon validation), and post-silicon validation in the bringup lab. Some of this is hard to avoid, due to the sheer size and complexity of today’s designs. However, there are three problems that commonly arise in the design, verification, and validation flow that can be avoided by rigorous application of specification automation.
The Imprecision of Natural Language
Every design, whether a single IP block or a room-sized massively parallel supercomputer, starts with a specification. The product marketing/management team defines the target market, talks to leading-edge customers, surveys the competition, and defines the key requirements for the product. The architecture team must then convert the description into a detailed specification from which the hardware and software teams can develop the physical product. While there have been significant advances in formal design specifications, today there is no way to completely specify a semiconductor design except with a natural language such as English.
The problem is that natural languages are inherently imprecise. Translating words into register-transfer-level (RTL) design code and programs in languages such as C/C++ is very much an inexact science. Naturally, any misinterpretation results in a system that does not operate as specified. The resulting design may not perform intended functionality, perform it incorrectly, or fail to meet performance and power requirements. Detecting these issues during verification and pre-silicon validation requires enormous resources to find them, debug them, fix them, and confirm that the fixes are correct.
The only way to get around this problem is to write specifications in a way that is precise and not subject to misunderstandings. While there is not (yet) a universal solution, there are many parts of a design that can be specified in rigorous, precise formats. Examples include registers and memories, state machines, data paths, interfaces, clock-domain-crossing (CDC) logic, functional safety mechanisms, and block interconnections. Available formats include IP-XACT, SystemRDL, state machine transitions, and spreadsheets. When your designers can write their RTL code accurately from these precise descriptions, the design is much more likely to be correct.
The Ambiguity of Natural Language
Natural languages are ambiguous as well as imprecise. There are many teams on an IP or SoC project who work from the same specification. In addition to the designers, the verification team must develop testbenches and tests, programmers must write embedded code and drivers, validation teams must run the hardware and software together, and technical writers must create end-user documentation. It is impossible for all these teams to read and interpret natural language specifications in the same way. Any inconsistencies delay TTM and consume lots of resources as the development teams figure out what’s wrong and fix it before chip fabrication.
The only way to avoid this problem is to automatically generate as many of the traditional manual files as possible. If RTL code, testbenches, and tests are all generated from executable golden specifications, there are no inconsistencies to be found and fixed during the verification process. The resulting design is correct by construction. If the drivers and embedded code that interact closely with the hardware are automatically generated along with the hardware, there are no inconsistencies to be found and fixed during pre-silicon or post-silicon validation. Not finding issues in the bringup lab means that chip turns will not compromise your project cost and schedule.
Automated generation from executable specifications, also known as specification automation, also helps with the first problem. A specification automation solution can generate RTL hardware much faster and more reliably than a designer. This saves time and resources while eliminating human errors such as typos. Similarly, generating software, verification and verification environments, and documentation directly from the specifications is faster and more accurate than manual effort.
The Evolution of Design Specifications
All the benefits outlined above would be compelling even if they only applied once on an IP or SoC project. That’s not reality; the truth is that specifications change constantly over the source of your project. Product managers continue to talk to potential customers and keep tabs on the competition, and sometimes this results in new features or requirements being added to the specifications. It is also common for implementation issues to ripple all the back to the specifications. Logic synthesis, layout, design-for-test (DFT) insertion, and other steps in the implementation process may require specification changes for resolution.
When all the hardware, software, verification, validation, and documentation files are written by humans, they must be updated manually every time that the specifications change. This introduces new opportunities for typos and different interpretations, delaying TTM as these issues are found and fixed. There is also a high likelihood that teams will get out of sync when multiple revisions of specifications are in play. Specification automation resolves the evolution problem entirely. Every time that the specifications change, the simple push of a button automatically regenerates all files for all your teams, ensuring consistency and keeping everyone in sync at all times.
Agnisys Provides the Answer
The Agnisys IDesignSpec™ Suite provides the industry’s best and most mature specification automation solution. Our suite handles all the types and formats of executable golden specifications mentioned above. It automatically generates all necessary design, verification, software, validation, and documentation files every time that specifications change. Please contact us to learn more or request a demonstration. We look forward to helping with your next project.
0 notes
Text
Unleashing the Power of Subgraphs: A Comprehensive Guide for Beginners
Blockchain technology has revolutionized the way we think about data and transactions, offering transparency, security, and decentralization. As the blockchain landscape expands, developers are constantly innovating to enhance the capabilities of decentralized applications (DApps). One such innovation that has gained prominence is the concept of subgraphs. In this comprehensive guide for beginners, we'll explore the fundamentals of subgraphs and how they can be harnessed to unlock the true potential of blockchain applications.
Understanding the Basics of Subgraphs
At its core, a subgraph is a structured subset of blockchain data that focuses on specific elements or events within a blockchain. Think of it as a way to organize and index data in a manner that makes it easily accessible and queryable. Subgraphs are particularly powerful when working with complex blockchain networks like Ethereum, where data can be vast and varied.
The Benefits of Using Subgraphs
**1. Simplified Data Retrieval:
Subgraphs provide a streamlined way for developers to retrieve specific data from a blockchain. Instead of sifting through the entire blockchain, developers can create subgraphs tailored to their needs, making data retrieval more efficient.
**2. Enhanced Querying Capabilities:
With subgraphs, querying becomes more intuitive. Developers can design subgraphs to index and organize data in a way that aligns with their application's requirements, allowing for more precise and faster queries.

**3. Modular Development:
Subgraphs enable modular development by allowing developers to focus on specific aspects of a blockchain. This modularity not only simplifies the development process but also promotes code reusability across different applications.
Creating Your First Subgraph: A Step-by-Step Guide
Step 1: Define the Purpose of Your Subgraph
Before diving into the technical details, clearly define the purpose of your subgraph. What specific data or events are you interested in? Understanding this will guide the subsequent steps.
Step 2: Set Up Your Development Environment
To create a subgraph, you'll need to set up your development environment. Platforms like The Graph provide tools and documentation to get you started. Install the necessary dependencies and initialize your project.
Step 3: Define the Subgraph Schema
The schema defines the structure of your subgraph. It outlines the entities and their relationships, essentially specifying what data you want to index. This step is crucial for ensuring your subgraph effectively captures the desired information.
Step 4: Implement Subgraph Mapping
Mapping is the process of converting blockchain data into a format that can be easily queried. Implement mappings to specify how data should be extracted and organized within your subgraph.
Step 5: Deploy Your Subgraph
Once your subgraph is defined and mapped, it's time to deploy it. This step makes your subgraph accessible to developers and applications looking to leverage the specific data you've indexed.
Real-World Applications of Subgraphs
**1. Decentralized Finance (DeFi):
DeFi applications often require complex data related to token transfers, liquidity pools, and user interactions. Subgraphs allow developers to create targeted solutions for DeFi projects, enhancing the efficiency of these applications.
**2. Non-Fungible Tokens (NFTs):
NFT platforms can benefit from subgraphs by organizing and indexing data related to the creation, transfer, and ownership of digital assets. This makes it easier for users and developers to explore and interact with NFTs.
Conclusion: Unleashing the Power Within
As a beginner in the world of blockchain development, embracing subgraphs opens up a realm of possibilities. Whether you're building a decentralized application, exploring data analytics on the blockchain, or diving into the exciting space of decentralized finance, subgraphs provide a powerful toolset for organizing, querying, and unleashing the true potential of blockchain data. By following this comprehensive guide, beginners can embark on a journey to harness the power of subgraphs and contribute to the ongoing evolution of decentralized applications.
1 note
·
View note
Text
MME Laughing Man FX READING: a translation by ryuu
The following tutorial is an English translation of the original one in Japanese by Dance Intervention P.
Disclaimer: coding isn’t my area, not even close to my actual career and job (writing/health). I have little idea of what’s going on here and I’m relying on my IT friends to help me with this one.
Content index:
Introduction
Overall Flow
Parameter Declaration
Billboard Drawing
Final Notes
1. INTRODUCTION
This documentation shows how to edit the Laughing Man effect and read its HLSL coding. Everything in this tutorial will try to stay as faithful as possible to the original one in Japanese
It was translated from Japanese to English by ryuu. As I don’t know how to contact Dance Intervention P for permission to translate and publish it here, the original author is free to request me to take it down. The translation was done with the aid of the online translator DeepL and my friends’ help. This documentation has no intention in replacing the original author’s.
Any coding line starting with “// [Japanese text]” is the author’s comments. If the coding isn’t properly formatted on Tumblr, you can visit the original document to check it. The original titles of each section were added for ease of use.
2. OVERALL FLOW (全体の流れ)
Prepare a flat polygon that faces the screen (-Z axis) direction.
Perform world rotation and view rotation inversion on objects.
Convert coordinates as usual.
World rotation and view rotation components cancel each other out and always face the screen.
3. PARAMETER DECLARATION (パラメータ宣言)
4 // site-specific transformation matrix
5 float4x4 WorldViewProjMatrix : WORLDVIEWPROJECTION;
6 float4x4 WorldViewMatrixInverse : WORLDVIEWINVERSE;
7
• WorldViewProjMatrix: a matrix that can transform vertices in local coordinates to projective coordinates with the camera as the viewpoint in a single step.
• WorldViewMatrixInverse: the inverse of a matrix that can transform vertices in local coordinates to view coordinates with the camera as the viewpoint in a single step.
• Inverse matrix: when E is the unit matrix for a matrix A whose determinant is non-zero, the matrix B that satisfies AB=BA=E is called the inverse of A and is denoted by A-1 . Because of this property, it’s used to cancel the transformation matrix.
• Unit matrix: asquare matrix whose diagonal component is 1 and the others are 0. When used as a transformation matrix, it means that the coordinates of the vertices are multiplied by 1. In other words:
8 texture MaskTex : ANIMATEDTEXTURE <
9 string ResourceName = "laughing_man.png";
10 >;
• ANIMATEDTEXTURE: textures that animate in response to frame time. Animated GIF and animated PNG (APNG) are supported.
• APNG: Mozilla Corporation's own specified animation format that is backward compatible with PNG. I hacked libpng to support it, but it was rejected by the PNG group because the specification isn’t aesthetically pleasing.
11 sampler Mask = sampler_state {
12 texture = <MaskTex>;
13 MinFilter = LINEAR;
14 MagFilter = LINEAR;
15 MipFilter = NONE;
16 AddressU = CLAMP;
17 AddressV = CLAMP;
18 };
• MinFilter: methods used for the reduction filter.
• MagFilter: methods used for the expansion filter.
• MipFilter: methods used for MIPMAP.
• AdressU: method used to resolve u-texture coordinates that are outside the 0-1 range.
• AdressV: method used to resolve v-texture coordinates that are outside the 0-1 range.
• LINEAR: bilinear interpolation filtering. Uses a weighted average region of 2×2 texels inscribed in the pixel of interest.
• NONE: disable MIPMAP and use the expansion filter.
• CLAMP: texture coordinates outside the range [0.0, 1.0] will have a texture color of 0.0 or 1.0, respectively.
• MIPMAP: a set of images that have been precomputed and optimized to complement the main texture image. Switch between images depending on the level of detail.
21 static float3x3 BillboardMatrix = {
22 normalize(WorldViewMatrixInverse[0].xyz),
23 normalize(WorldViewMatrixInverse[1].xyz),
24 normalize(WorldViewMatrixInverse[2].xyz),
25 };
Obtain the rotation scaling component xyz of the inverse matrix, normalize it by using normalize, and extract the rotation component. Do this for each row. The 4x4 inverse matrix contains a translation component in the fourth row, so it’s cut off and made into a 3x3 matrix.
The logical meaning of the matrix hasn’t been investigated yet. Without normalization, the size of the display accessory is 1/10, which suggests that the world expansion matrix component is used as the unit matrix. Also, each row corresponds to an x,y,z scale.
29 struct VS_OUTPUT
30 {
31 float4 Pos : POSITION; // projective transformation coordinates
32 float2 Tex : TEXCOORD0; // texture coordinates
33 };
A structure for passing multiple return values between shader stages.
4. BILLBOARD DRAWING (ビルボード描画)
35 // vertex shader
36 VS_OUTPUT Mask_VS(float4 Pos : POSITION, float2 Tex : TEXCOORD0)
37 {
38 VS_OUTPUT Out;
39
40 // billboard
41 Pos.xyz = mul( Pos.xyz, BillboardMatrix );
BillboardMatrix is a 3x3 rotation matrix, so multiply it by the xyz3 component of Pos.
If the object is fixed in the world and doesn’t rotate, then Pos.xyz = mul(Pos.xyz, (float3x3)ViewInverseMatrix); or Pos.xyz = mul(Pos.xyz, (float3x3)ViewTransposeMatrix); cancels the screen rotation. Since the rotation matrix is an orthogonal matrix, the transpose and inverse matrices are equal.
42 // world-view projection transformation of camera viewpoint.
43 Out.Pos = mul( Pos, WorldViewProjMatrix );
44
45 // texture coordinates
46 Out.Tex = Tex;
47
48 return Out;
49 }
Perform world-view projection transformation and return the structure as usual.
51 // pixel shader
52 float4 Mask_PS( float2 Tex :TEXCOORD0 ) : COLOR0
53 {
54 return tex2D( Mask, Tex );
55 }
Return the color of the texture retrieved from the sampler.
57 technique MainTec < string MMDPass = "object"; > {
58 pass DrawObject {
59 ZENABLE = false;
60 VertexShader = compile vs_1_1 Mask_VS();
61 PixelShader = compile ps_2_0 Mask_PS();
62 }
63 }
Self-shadow disabled? (technique is ignored by object_ss when enabled), run without depth information.
• ZENABLE: enable seismic intensity information (Z buffer) when drawing pixels and make drawing decisions.
5. FINAL NOTES
For further reading on HLSL coding, please visit Microsoft’s official English reference documentation.
3 notes
·
View notes
Text
Adobe Animate Character Animation

When you’re finished animating, select the scene in the Project panel and adjust the scene’s duration in the Properties panel. You now have two options for bringing your character into Adobe After Effects:
Character Animation Adobe Animate
Adobe Animate used to be called “Flash.” It is a full-blown animation application that allows you to create interactive (or non-interactive) animated stuff (characters, graphics, interfaces, etc.) from nothing. It’s complex, but very powerful. Go on the Adobe site for more info.
Use Dynamic Link: Launch After Effects. Drag the scene from the Project panel in Character Animator to the Project panel in After Effects and then right-click it and select New Comp from Selection. When you use Dynamic Link, any changes you make to the puppet in Character Animator will automatically update in After Effects.
Export an image sequence: Choose File > Export > PNG Sequence and WAV and specify a name and location. This exports the video as a PNG sequence and the audio as a WAV file to use in After Effects. Now launch After Effects and choose File > Scripts > New Comp from Character Animator Recording.jsx. Select the first PNG file in the exported PNG sequence.
Go ahead and preview your scene. If you want to use the puppet in a composited scene, import a background from Adobe Stock or from a shared Creative Cloud Library.

Character Animation Adobe Animate
Adobe offers animation apps that work with all your ideas — and each other. Animate in real time with Character Animator, or use Animate to create interactive vector animations. Create intros, transitions, and more with After Effects. And move seamlessly between them all. Another aspect of Adobe Animate that makes it great for character animation is its use of mesh points. When dragging and animating a character, Animate integrates points that animate together on the body of the character to make it move as if it’s one unit. This allows for realistic and lifelike movements. Using Bone tool animation in Animate; Work with character rigging in Animate; How to use mask layers in Adobe Animate; How to work with scenes in Animate; Interactivity. How to create buttons with Animate; Convert Animate projects to other document type formats; Create and publish HTML5 Canvas documents in Animate; Add interactivity with code.
1 note
·
View note
Text
Microsoft Publisher Business Report Templates

Create a one-sided business card Click File New and choose Built-in to use one of the templates installed in Publisher. In the Business Cards catalog, under Installed Templates, click the design that you want.
The Best Source for Microsoft Word Templates (With Unlimited Use) Envato Elements is the perfect place to find professional Microsoft Word report templates. For a low monthly fee, you'll have access to unlimited downloads of Microsoft Word templates. Get business, themes, photos, videos, fonts, and other resources to use in your business projects.
When you open Publisher, you'll see a catalog of templates to choose from. To create a publication, select a template that is most like what you want your publication to be. After you open the template, you can change it to include all the elements—such as colors, fonts, graphics—that you want.
Microsoft Publisher Web Page Template
Microsoft Publisher Templates Business Cards
Microsoft Publisher Business Report Templates Microsoft
Microsoft Publisher Business Report Templates Word
Click File New and choose Built-in to use one of the templates installed in Publisher. In the Business Cards catalog, under Installed Templates, click the design that you want. Note: If you know that you will be printing on a specific manufacturer's product, scroll to the specific manufacturer's section, and click the product that you will be using. Microsoft’s Publisher is a program specifically designed to create publishing worthy documents. It focuses more on the design and looks of the document than the content. MS Publisher Microsoft templates are the skeleton format for different types of documents. They are available in different designs that a user can download from Office Online.
In this day of DIY’ers, everyone is tech savvy enough to create and publish their own digital content, and computer software giants like Microsoft have programs that make it easy to do so.
You may have your basic applications that cover text documents (Microsoft Word), numerical data (Microsoft Excel) and presentation content (Microsoft PowerPoint).
For professional print publications, there’s Microsoft Publisher.
The application provides you with affordable and easy-to-use desktop publishing features that anyone can use. Because of this, it’s a great option for small businesses, everyday users, educators, parents or freelancers who need to design publications, but don’t have graphic design backgrounds. The application allows them to create branding and sales material that look professional.
Below we’ll give you a better idea of the application, what it does, how to work with it, and some resources to get you started.
What Is Microsoft Publisher Used For?
Microsoft Publisher lets you work as easily as you do in Microsoft Word, but instead of using tools for text, you’ll be using tools for editing page layouts and visual content.
Having said that, you may be wondering, what are the things you can do in Microsoft Publisher?
The answer: almost anything you need to professionally design and publish your material. Some examples include:
Personalized birthday cards
Event posters
Newsletters for small businesses and organizations
Professional business cards
Flyers and programs
Postcards and brochures
Of course, that’s just the tip of the iceberg. Editing and customizing that content is where MS Publisher really shines. You can work from scratch, from templates, or from existing content you may already have.
How To Convert PDF to PUB?
The beauty of the latter is that if you have legacy content in the PDF format which you need to use or update, you can convert PDF to PUB with Able2Extract PDF converter first.
Here’s how:
Open your PDF in Able2Extract.
Select the content you wish to convert.
Click on the Convert to Publisher command on the toolbar.
Save your new .pub file to your computer.
Microsoft Publisher Templates
On top of helping you work with your original PDF content, Microsoft Publisher also comes equipped with hundreds of premade layouts and cookie cutter templates you can use for guidance, ideas or inspiration.
To use a template in MS Publisher:
Click on File > New.
Then, you can either:
Select one of the Featured templates, and click Create.
Choose Built-in and scroll to select a category and choose a template, and click on Create to use it.
Use the Search functionality for online templates to find the kind of template that you need.
Once the template is open in Publisher, you can start formatting and editing it.
Getting Started With Microsoft Publisher
Before you start getting your hands dirty, there are a few basics you need to know. Because MS Publisher deals with all kinds of layouts, objects, formats and content, it doesn’t work exactly like you’re used to in MS Word. Below is a quick guide on how to go about the basic stuff.
Working with Objects
You’ll notice that in Publisher, everything will be formatted into movable “boxes”. These are known as objects, and are outlined with a border with four white circles and four white squares.
This may seem weird at first, but these frame-like boxes allow you to group, edit, manipulate and move content around on the page more easily. Here are some ways you’ll be working with objects frequently:
Adding text – To add text to your project, you work within the text boxes and can edit the text within the object directly. You can also add your own by going to the Insert tab and clicking on the Draw Text Box command, which lets you click and drag to create your own text object where you want it.
Most of the templates in Publisher will offer up pre-made boxes and objects, so getting familiar with these is necessary.
These boxes usually contain dummy text which you can easily double click and edit, customizing the font, size, and color.
Adding pictures – Adding pictures to your content is as easy as clicking on Home > Pictures. You’ll have options to insert pictures from a file, OneDrive or from a search on Bing. In addition, you have a number of options to format your picture in your publication.
Microsoft Publisher Web Page Template

Just head over to the Format tab when your picture is selected and you can start tailoring your images. To learn more about working with images, you can read Microsoft’s tips on working with images in Microsoft Publisher.
Using Building Blocks
Building blocks make it easier for you to build and customize your publication by giving you pre-made elements. You can find these under the Insert tab on the ribbon:
By exploring a few customizations, you can easily select an element you want and then click and drag to reposition and resize the element accordingly. It’s an easy way to apply and manipulate reusable pieces of content.
Microsoft Publisher Templates Business Cards
You’ll find this coming in handy when you want to add headings, borders, sections, accents, and advertisements. Microsoft Publisher has these building blocks built right in, but you can also create your own.
Using the Design Checker in Publisher
This is another feature you’ll want to use when you’re done putting your publication content together. The Design Checker is accessible via File>Info>Design Checker. It’s a tool that reviews your final content for layout or design problems and it appears on the right hand side of the interface.
Think of this tool like your everyday spell checker, but for your publication content instead of textual typos.
The Design Checker reviews your content for a variety of design and layout problems, allowing you to catch and fix them before you finalize a print job.
And don’t worry if you aren’t a designer, the tool will provide you with explanations and suggestions on how to fix the problems it detects.
You can also specify the types of problems the tool will look for by clicking on the Design Checker Options dialog box.
Printing up your Project
As an application geared towards creating digital content meant to be printed up, this will be another basic task you’ll need to be familiar with. To print up your project, Microsoft Publisher has a few methods to help print your content.
There’s the standard method that uses the Printer functionality which you’re familiar with if you’re printing a publication on your desktop printer. The only thing you’ll need to do is ensure that you have the settings adjusted to print your content correctly on the size and type of paper you need. Do remember to save your project first, though, before you print!
In addition to your usual PDF and common file types, there is also the Pack and Go Wizard via File>Export>Pack and Go.
This method will give you options on how to save your file for different printing purposes – even for a commercial printer – so you don’t have to worry about the technical details of formatting and settings. The Wizard will do that for you. You simply decide which option is best for your needs:
Knowing how to work your way around with the above basics will let you work easily with any type of layout or project you’re working on.
Microsoft Publisher Tutorials
Now that you know a bit more about how Microsoft Publisher works, it’s time to try your hand at it. In addition to some templates, we collected a few Microsoft Publisher tutorials to help you quickly get started:
So, armed with the basics, you’re now ready to start creating professional looking content for publishing without the hefty price tag.
Let us know in the comments what other questions you have for working with your digital content and how MS Publisher worked for you.
Back to Business Card Templates Microsoft Publisher
98 Report Business Card Templates Microsoft Publisher Now with Business Card Templates Microsoft Publisher
You can Download 98 Report Business Card Templates Microsoft Publisher Now with Business Card Templates Microsoft Publisher full size click the link download below
Just click download link in many Resolutions at the end of this sentence and you will be redirected on direct image file, and then you must right click on image and select 'Save image as'. 220 × 165/1280 × 720
We hope you can find what you need here. We always effort to show a picture with HD resolution or at least with perfect images. 98 Report Business Card Templates Microsoft Publisher Now with Business Card Templates Microsoft Publisher can be beneficial inspiration for those who seek an image according specific categories, you can find it in this site. Finally all pictures we have been displayed in this site will inspire you all. Thank you for visiting.
This image is provided only for personal use. If you found any images copyrighted to yours, please contact us and we will remove it. We don't intend to display any copyright protected images.
Microsoft Publisher Business Report Templates Microsoft
Random Images
Microsoft Publisher Business Report Templates Word
☐ 287 views
1 note
·
View note